ENGAGE:
The Kitchen Designer

Thanks for stopping by! I'm Susan Serra, certified kitchen designer, and my mission is to take kitchen design style, function and analysis to a higher level. Here's why the kitchen has the most honored place in the home - all five senses reside in the kitchen.  Best...Susan  Contact: susan@susanserraassociates.com
   

Follow my personal profile here on Google+ for LOTS of fresh content! Google+


JOIN ME IN MY NEW GOOGLE+ COMMUNITY:


Subscribe by Email


houzz interior design ideas

Follow on Bloglovin

Interior Design Blogs
Kitchen Design

SCANDINAVIAN MADE

Our webshop of handmade Scandinavian rugs and ceramics

BORNHOLM KITCHEN

Scandinavian inspired, warmly modern kitchens

DESIGN & CONSULTING

Custom kitchen design by Susan Serra, CKD, CAPS

SEARCH BY CATEGORY
SEARCH SITE:

Entries from December 1, 2011 - December 31, 2011

Saturday
Dec312011

My Lovely Trip To Bornholm, Denmark

Bornholm is such a special place. It is at once simple yet dramatic, heavily textured yet clean, colorful yet sometimes viewed in neutrals for as far as the eye can see. It's where one side of my family tree is documented, so far, to the mid 1800s, having been born on Bornholm. Funny, the other side of my family tree is documented to the very early 1800s far away from Bornholm, also in Denmark, in Jutland, the largest piece of land one thinks of when one thinks of Denmark. 

I went to Bornholm, then to Copenhagen in late August, alone, in search of artisans for my and my daughter's new brand, Scandinavian Made, a webshop of artisans' works that are made in Scandinavia, by the artisan, whose works are available in the US exclusively in our webshop.

I drove around Bornholm, often losing my way and not caring, and found the most amazing artisans! The landscape is incredible, the people are friendly and the food is, to me, amazing!! I've been to Bornholm before, and it always refreshes my spirit. Here are images of Bornholm in late summer, perfect for this cold winter's day. All images taken by me.

Below, a stop off on the side of the road

Below, one of my most favorite images, ever. The sand on this beach is famous for having been used as hour glass sand, it is so incredibly fine.

Below, stunning rock formations in the sea

Below, on a rugged path, looking down to the sea

Below, I was moved by the beautiful, ancient, round churches in Bornholm, one in which my grandmother was baptized. Below, a church built in 1150!

Below, a gallery that I wish were open! Artists have been drawn to Bornholm for many years, as the quality of light is said to be unique and inspiring

Below, the Bornholm art museum, a stunningly beautiful place

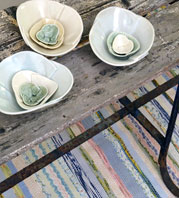
Below - One day, as I was wandering, I came upon this lovely ceramics shop, owned by the artisan, that was open

Below - I was truly astounded/touched/moved by the beauty of the pieces I encountered. I saw that these pieces were made by the artisan with what appears to be raw emotion. You can see more of this fabulous artisan's original works in my and my daughter Kelly's webshop, Scandinavian Made

The lovely small villages on the coast are serene

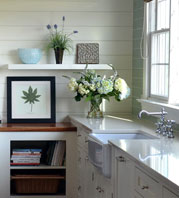
And last but not least, the reception area of a beautiful inn that I stayed at. The decor is that great Scandinavian eclectic combination of classic traditional furnishings set within a modern decorative foundation (floors, furniture, lots of white and art.)

What does this post have to do with kitchens? Everything! It's all inspiration which touches all future projects.

Wednesday
Dec282011

Healthy Kitchen Design - And The Medifast Program

We're thinking about living a healthy life (again) now that New Year's Day will be here shortly. Can a kitchen be designed that actively contributes to, and encourages, healthy eating? I'm not (entirely) sure, but here's how I would approach the design, plus a few tips on healthy eating. 

Below, a Blanco sink

SINK AREA

  • Design in two sinks including one prep sink to encourage easy access for prepping fruits and veggies
  • Have colanders near the sink to drain fresh fruits/veggies
  • Have a cutting board near the sink and/or trash for prep work
  • Add a filtered cold water tap to encourage you and your family to drink water
  • Keep the salad spinner nearby

COOKING APPLIANCES & METHODS

  • Have steam baskets or a portable steamer easily accessible to encourage cooking steamed vegetables
  • Alternatively, design a steam oven into the kitchen to cook vegetables, meat and fish in a healthy manner
  • Add a grill pan to the cooktop, a portable electric grill, or design a built in grill into a new kitchen as a tasty, healthy, cooking method
  • Have on hand an electric rotisserie or a built in rotisserie in the wall or oven for flavorful, lower fat, cooking
  • Use a vertical poultry roaster in the oven which allows fats to drip off the chicken
  • Cook with dried and fresh herbs frequently to add a layer of elegant taste to your foods

Below, Gaggenau's Steam Oven

SMALL APPLIANCES

  • Leave the cuisinart out on the counter to encourage quick prep of veggies
  • A blender is great for smoothies, gazpacho and preparation of other healthy foods any time of day
  • Keep knives sharp for ease of use with all fresh foods

OTHER APPLIANCES

  • Select the right size refrigerator for your family - too big and too much food will sit in the refrigerator for too long a period of time growing old and tasteless. 
  • Package food properly in the refrigerator to maintain optimum taste and freshness

DINING

  • Eat on small plates occasionally in an effort to control portion size
  • Invest in a good quality oil and vinegar for super tasty salads
  • Eat vegetables you are unfamiliar with to add interest to everyday meals

GENERAL

  • Frequent your local farmer's markets, farm stands or coops to experience the selection of fresh foods in a delightful setting
  • Plant and raise fruits and vegetables!
  • Have healthy foods such as fruits, vegetables, nuts and whole grain foods on hand for snacking
  • Make the shift to whole grains for everything - pasta, bread, cereals, baked goods


MY STORY

BEFORE - Thankfully this hairstyle is goneI've used just about all of these techniques and others in a decision to eat healthy this past year. Last year, the Monday after Thanksgiving (an unusual time to start), I started a journey to lose the weight added over 20 years after the birth of my 3rd child. I did not hold out much hope for success (as usual) and started it with a "whatever."

Day by day, week by week, to my surprise, I became committed to this weight loss program that my doctor recommended to me and the weight came off. It both put me into food rehab and helped me learn to eat healthy at the same time. My total weight loss was ... drumroll .... 75 pounds! THAT amount of weight has been a life changer. Logistically, had I felt hungry (it was rare) I would never, ever, have stuck to it. That was my one requirement - I could not be hungry all day, every day! Hunger is curbed on the plan I went on: Medifast. That was really the catalyst for success for me.

AFTER - Thankfully this hairstyle is gone too!!Before: Flat shoes, shapeless clothes, low energy, and I refused to wear denim jeans for at least 15 years. Now: Heels? Yes-4" high. Skinny jeans? 5+ pairs. Cinched belts? Quite a few. Leggings? YES! I am far healthier, energetic, happier, and confident, than I have been in 20 years. It was a big moment when I purchased my first pair of denim jeans, in the spring, in well over a decade. It was just a principle for me-I would not wear denim jeans while being overweight. 

Medifast is so easy, safe and simply works. I am now a coach for Medifast via their sister site, TSFL-Take Shape For Life. Are you ready to get healthy and slim? I know this: When the time is right, the desire and motivation will be there. In my case, it came a couple of days into the program. If I can do it, you can too.  Contact me for further information. 

So, yes, I know first hand how to design and equip a healthy kitchen based on personal experience living with all of these suggestions made here, for some time. I will add more tips on designing a healthy kitchen soon! 


Wednesday
Dec212011

Kitchen Backsplash Height

The height of the backsplash, the space between the countertop and the bottom of the wall cabinets, is often left as an afterthought by many kitchen designers and homeowners. It's rare in my experience that the client expresses an opinion about the backsplash height. However, If the height of the backsplash is not considered carefully, comfort and function could very well be at risk and affect one's lifestyle in the kitchen - for a very long time.

Below, a backsplash height calculated for a variety of issues: a concealed microwave, height of the client, function and display.

Just this morning, I received a question from a fellow kitchen designer. I wrote back an answer and realized that the answer was good information for a blog post. 

Hi Susan,

In discussions with my design team I am questioning the distance between the counter top and the bottom of the wall cabinets.  Two of my designers, who have over 75 + years of experience feel strongly that “custom design” should be a distance of 15” to maybe 16.5” 

I, on the other hand , being 6’3” tall feel that anything less than 18” (or with a molding applied to hide lighting) 17.5” is too tight a space.  I’m not asking for a definitive answer, but I thought with all of your travels and experience in the marketplace you might be kind enough to share your design thoughts with me about this.

I wish you and yours a very safe and enjoyable Holiday Season, and I very much enjoy reading your blog. Thank you for your time.

My answer:

Sure, I'm very happy to weigh in on this issue. However, you answered your own question! Where possible, which is nearly always the case, one should attempt to customize the height of the backsplash depending on the height of the homeowners and/or primary chef/bottle washer. It's a nuance, actually.

Below, calculations based on multiple criteria as above: client height, storage needs, display.

Two tall homeowners? Increase the height.

Two short homeowners? Shorten the height but beware of countertop appliance heights since that must be dealt with.

Two homeowners, one short/one tall, both helping out? That's a negotiation that might take a little more time and is a personal decision between the homeowners. In that case, the proposed/negotiated backsplash height really must be mocked up so each can experience the height and decide what works and what does not work.

Perhaps, then, tall pantry storage can come into play where access is more "democratic." Or, one area may have a lower backsplash and another could have a higher backsplash if designed to make sense visually. A countertop wall cabinet will help too.

The other issue, of course, is if trim is added below the wall cabinets, potentially shrinking an already short backsplash or not allowing countertop appliances to fit.

Then, you have children. Do the homeowners wish children to take an active role in the work within the kitchen? If so, storage should be planned to be at lower levels via base cabinets (dish drawers) or a pantry with better access.

Below: Kitchen of Cynthia Bogart, editor of The Daily Basics

I'm always compelled to note that there is a 15+" wide cabinet to the left of the range :)

For my clients of typical height, I usually opted for a 17" backsplash and ran it past them to verify that worked for their lifestyle and did not interfere with countertop appliances. I was taught way back that the average backsplash height could be from 15-18". That, however, is like saying "I'd like a brown stained cabinet" ... it's only a starting point.

I hope that helps!!
Regards, 
Susan

What I did not add into this note (and should have) was the issue of physical abilities of the homeowners. Having a family member (in my own home) whose reach and bending ability has changed dramatically, the physical ability of family members is a critical question to ask as well.

Tuesday
Dec062011

Decorating For Christmas In The Kitchen!

I've been thinking quite a bit about decorating the kitchen for Christmas, and that does not mean that it has to be this big, ambitious, undertaking. Chances are you already have nearly all the "ornaments" that you need on hand to do the job.

Prior to decorating my own kitchen for Christmas (disclaimer, we moved to this home 3 years ago and have not yet renovated the kitchen so it's definitely not "me") I was a guest on Martha Stewart radio on Monday, December 2nd to talk about this very topic. So, let's get on with the ideas! 


Around the same time, I had a lovely offer from Balsam Hill, retailer of artificial Christmas trees to use some of their products in my home. Of course, since the kitchen is usually the poor step sister in terms of Christmas decorating, I thought it was a great topic to share. Here we go!

1. Frame a kitchen window with greens and twinkling lights - or a huge, oversized wreath!

2. Change out dining chair seat cushions, placements and other easily changeable fabrics with holiday colors/motifs.

3. scan the kitchen collectibles on display and replace with holiday themed colorful and decorative items.

4. Don't forget the floor - replace the kitchen rug or runner for the holidays to have a fresh look! 

5. Add small twinkling holiday lights around the base of a kitchen island or on the sides and back of an island for a holiday glow.

6. Add a grouping of bulbs to hang just below the bottom of the kitchen table light fixture.

7. Add roping around the kitchen: above the cabinets or under the wall cabinets and tie in dime store kitchen utensils in your favorite holiday color.

8. Gather branches from outdoors, keep natural or spray paint in a holiday color and bundle together with twine and/or add ornaments to the arrangement.

9. Use Japanese Mashing Tape (Washi tape) and tape up past family photos or greeting cards on a wall in the shape of a Christmas tree (a simple triangle shape.)

10. Lots of candles all over - we LOVE the idea of an ebelskiver pan to use as a candle holder when not in service on the stovetop! 

11. Hang ornaments or bells on cabinet hardware (ok, not toooo many bells).


12. Paint cardboard fit to size in your holiday color and fit it to the rear of glass door cabinets for a holiday pop of color, easy to remove after the holiday. 

In my kitchen, I really enjoyed digging through my kitchen drawers (and combing through the local five and dime store) to find lots of small kitchen utensils to hang on the lovely roping from Balsam Hill. The two small Christmas trees came from them as well, and I think they are a perfect anchor for the shelf on each side.

Of course, anything goes, keep it simple or ambitious, but above all, don't stress! Have fun! The kitchen will thank you for it (it would be nice if it were grateful enough to clean itself...)